Thursday, March 31, 2011
Picture Lock
Well, thursday is picture lock and I've got my timing nailed down for the animation. My main priority now is to do some green screen and special effects work that need polishing, find sound, and to schedule a time in the near future for my composer to shoot in the sound studio. I've got 3 of 4 sections of my film totally done, so after I do some fx work I should be good to go. huzzah!

Thursday, March 10, 2011
Almost Done!
This is my last week animating, and things are winding down. It's been fun to experiment with lighting and scary creepy effects, as well as trying to make my Stick Bug character as horrific as possible.
The least fun part is that my feet are tired from standing for so long!

 I plan to finish shooting this saturday; I have several still greenscreen shots of the ghost boy, and 4 animated greenscreen shots of a few seconds each, so it's completely possible. After that I just have to edit a lot and paint some stuff out and put some effects on the surreal part to make it seem like it's underwater/slow motion and add sound and find a composer and figure out the credits and render everything and I'll be done! Huzzah!
The least fun part is that my feet are tired from standing for so long!


Thursday, February 24, 2011
This week I kept right on animating. I'm focusing on lighting my characters in in surreal ways for the middle portion of my film, and it's been a lot of fun experimenting with different ways to get the creepy effect i'm after. The least fun part is trying to upload the huge tif files from the computer to my hard drive; it takes from 4-8 hours for a 5 gigabyte file to transfer.
Progress is going well, and I hope to finish on schedule if all goes as planned. I've been looking into composers and have found one that is possibly willing to work for free, so I may go that route instead of using netmix or free opensource music.
Progress is going well, and I hope to finish on schedule if all goes as planned. I've been looking into composers and have found one that is possibly willing to work for free, so I may go that route instead of using netmix or free opensource music.
Thursday, February 17, 2011
An encouraging week
This week I accomplished a lot, both in terms of animation and in figuring out the way I want the final look and feel of my thesis film to be. I am currently on schedule with my shots completed. The most fun part of the week was scrolling through my animator and realizing that all the badly-drawn storyboards are now finished animation, hopefully less crappy than the storyboards. The worst part was the backache I got from spending so many hours bending over animating!
I am considering changing the middle portion of my film where the ghost doppelgänger and stick bug attack the boy, to make it more surreal and abstract, since it is after all a dream. I want to experiment with lighting, cool flickers and colored gels, crazy camera angles and weird materials to give a super creepy vibe. The narrative will still be there, but this will give me more flexibility to work within time constraints without having to stick to a tight schedule.
I am considering changing the middle portion of my film where the ghost doppelgänger and stick bug attack the boy, to make it more surreal and abstract, since it is after all a dream. I want to experiment with lighting, cool flickers and colored gels, crazy camera angles and weird materials to give a super creepy vibe. The narrative will still be there, but this will give me more flexibility to work within time constraints without having to stick to a tight schedule.
Thursday, February 10, 2011
this week
This week I've been revising the animation I've done, as I continue to complete even more shots. I've enjoyed creating each shot and making them more unified through editing, zooming, and creative editing.
One thing that has been difficult this week is realizing that I'll probably have to cut some of the more extraneous shots in order to finish on time. It won't hurt my story, but it will be hard to see some of the shots that I was very attached to be cut out of the story. If I have time at the end I'll be able to add them in, though.
All in all, another productive week!
One thing that has been difficult this week is realizing that I'll probably have to cut some of the more extraneous shots in order to finish on time. It won't hurt my story, but it will be hard to see some of the shots that I was very attached to be cut out of the story. If I have time at the end I'll be able to add them in, though.
All in all, another productive week!
Thursday, February 3, 2011
more animating
This week I've been continuing to animate. Things are going well for the most part, and animation is taking abuot as much time as I estimated it would. The most fun part this week has been seeing my characters come to life as I work on some shots that require more acting and facial movement. The least fun part has been that, although the animation itself is not taking longer than I thought it would, it does take a longer time to set up each shot within the camera to get an acceptable composition and match up the eyelines and characters to the previous shot, to keep things consistent. This is harder work than I imagined when I was just drawing up the storyboards and could easily put the character anywhere in the frame that I wanted without too much worry about physical limitations. All in all though, production is going well and I'm optimistic that I'll finish in time.
Thursday, January 27, 2011
animation!
This week I finally began animating. My goal is to complete 7 shots per week, though I left several weeks for unforeseen errors in my production schedule. The first day of shooting went well, and in addition to figuring out the lighting and camera settings I animated 4 shots. The most fun part was seeing everything I've built come together under the camera to create a scene with a certain feel and mood. The least fun part was probably either dealing with all the logistics of negotiating a shooting space, or the time when I got a nasty splinter and my finger started dripping blood all over the place.


Tuesday, November 30, 2010
Puppets are done!
Well, I finally finished my puppet's costuming, head sanding and painting, and eye insertion. The most enjoyable thing was seeing the puppets I've been working on and planning for more than a semester finally come together into a finished product. The most difficult thing was working nonstop and skipping sleep to try to finish on schedule. Pictures below of the finished puppets, as well as some set photos.


Tuesday, November 23, 2010
update
this week I've been working mainly on sanding, painting, and finishing the heads I printed out on the 3D printer. I also worked out an eye mechanism to make the pupils rotate in the skull, and fitted the two tiny magnets into each separate piece. I had a lot of fun figuring out which colors to paint the characters to make them fit the coor scheme but without needing to have extremely realistic flesh and hair tones.
Costuming is also coming along; the most difficult thing this week has been figuuring out how to make the shoes for each character; in terms of materials that need to be both flexible and tough for when I animate the walk cycles.
A lot of the feedback I got when I presented my animatic to the graduate seminar advised me that the beginning of my film was too slow, and that I should speed it up and get to the main action of the stick bug and ghost boy. This was really helpful, and should allow me to cut even more out of my animatic, making it more feasible as I am nearly but not quite on schedule for animating.
I will post pictures hopefully tonight of my progress so far, unfortunately I don't have a camera right now so I need to locate one
Costuming is also coming along; the most difficult thing this week has been figuuring out how to make the shoes for each character; in terms of materials that need to be both flexible and tough for when I animate the walk cycles.
A lot of the feedback I got when I presented my animatic to the graduate seminar advised me that the beginning of my film was too slow, and that I should speed it up and get to the main action of the stick bug and ghost boy. This was really helpful, and should allow me to cut even more out of my animatic, making it more feasible as I am nearly but not quite on schedule for animating.
I will post pictures hopefully tonight of my progress so far, unfortunately I don't have a camera right now so I need to locate one
Tuesday, November 16, 2010
Update
This week I've been working extremely hard on finishing my set and completing the last stages of puppet-making. It requires a lot of various random skills that I've had to learn, like sawing very fragile wood panels, cutting through steel rods with a dremel tool (I wouldn't recommend it), and the proper application of resin to fiberglass cloth, in addition to sewing skills, clothing design and pattern knowledge, balance of color and contrast within each puppet as well as how each one fits into the color and tonal range of the set as a whole.
The most difficult thing, outside of all the physical labor, has been planning how to coordinate the color choices I would LIKE to have ideally, with the reality that certain materials only come in a limited range of colors, like a certain shade of beige for the subway seats or a certain metallic tone for the paneling on the floor. This also applies to costuming; forcing me to work around the patterns and colors of fabric I can find, rather than planning exactly what color each piece of clothing will be and then trying to find it at the fabric store, which gets really frustrating.
The most enjoyable thing this week has probably been realizing that, although I didn't get as much up-front tangible puppet and set building done over the summer as i would have liked, all the trial-and-error experimentation with materials and processes I did during that time, as well as the extensive thought and problem-solving concerning HOW I was going to build things, has helped me a lot now. It's much easier to focus on making the puppets and set look good when I don't have to worry as much about details of a specific process that's really easy to mess up, like how many times to dip latex hands or what size of square brass tubing to track down in a tiny Santa Monica craft shop.
The most difficult thing, outside of all the physical labor, has been planning how to coordinate the color choices I would LIKE to have ideally, with the reality that certain materials only come in a limited range of colors, like a certain shade of beige for the subway seats or a certain metallic tone for the paneling on the floor. This also applies to costuming; forcing me to work around the patterns and colors of fabric I can find, rather than planning exactly what color each piece of clothing will be and then trying to find it at the fabric store, which gets really frustrating.
The most enjoyable thing this week has probably been realizing that, although I didn't get as much up-front tangible puppet and set building done over the summer as i would have liked, all the trial-and-error experimentation with materials and processes I did during that time, as well as the extensive thought and problem-solving concerning HOW I was going to build things, has helped me a lot now. It's much easier to focus on making the puppets and set look good when I don't have to worry as much about details of a specific process that's really easy to mess up, like how many times to dip latex hands or what size of square brass tubing to track down in a tiny Santa Monica craft shop.
Wednesday, November 10, 2010
Process Description
Process in Modeling and Printing a 3-part Stop-Motion Puppet Head
1: First, I created 3 polygon primitive cubes in Maya. I drew up several model sheets of my character’s head from the front, side, top and back view, in order to give myself a frame of reference while modeling.
2: I moved and scaled these polygon cubes to correspond to the back of head, top of face, and bottom of face respectively of my character. I then scaled each of these cubes down by half, so that the left faces of each cube rested on the y-axis. This is to enable me to model both sides of the face simultaneously, by selecting each cube and clicking Edit: Duplicate Special (making sure in the settings it is parented to the original object as set as an INSTANCE), setting the object’s scale to -1 on x-y axis, and to 1 on each of the other axes. If this doesn’t work then you may have to experiment with the settings to see which axis the object is being mirrored across, and see what fits.
3: after each of the three polygons was mirrored across the y axis, I added edge loops to each one in places that seemed necessary, then simply moved vertices around, added edge loops and extruded faces as needed until I had a low-poly model of my head.
4: I then extruded the inner part of each of the pieces, so as to have a hollowed out inner shell. When I liked how it looked, I deleted the duplicated objects on one side of the y-axis that I created earlier, selected the original 3 objects that remained, and used Mirror Geometry on each one in turn to simultaneously mirror and merge them across the y-axis.
5: I selected only the faces of each piece on the part of the head that is visible to the eye when all pieces are put together, leaving the faces that touch the other pieces and the inside hollowed out part unselected, and used Edit Mesh: Smooth to smooth out each piece. This creates some polygons with more than 4 sides, which Zprint doesn’t like, so after smoothing I used Edit Mesh: Cleanup, checking only the box that says “faces with more than 4 sides”.
6: I checked my model to make sure there were no holes or 5+ sided faces, and to make sure that each of the three pieces fit together seamlessly, then exported each piece separately as an OBJ file.
7: I then opened each OBJ file in Rhino, exported them as STL files, and imported them into Zprint, where they were (hopefully) ready to print!
1: First, I created 3 polygon primitive cubes in Maya. I drew up several model sheets of my character’s head from the front, side, top and back view, in order to give myself a frame of reference while modeling.
2: I moved and scaled these polygon cubes to correspond to the back of head, top of face, and bottom of face respectively of my character. I then scaled each of these cubes down by half, so that the left faces of each cube rested on the y-axis. This is to enable me to model both sides of the face simultaneously, by selecting each cube and clicking Edit: Duplicate Special (making sure in the settings it is parented to the original object as set as an INSTANCE), setting the object’s scale to -1 on x-y axis, and to 1 on each of the other axes. If this doesn’t work then you may have to experiment with the settings to see which axis the object is being mirrored across, and see what fits.
3: after each of the three polygons was mirrored across the y axis, I added edge loops to each one in places that seemed necessary, then simply moved vertices around, added edge loops and extruded faces as needed until I had a low-poly model of my head.
4: I then extruded the inner part of each of the pieces, so as to have a hollowed out inner shell. When I liked how it looked, I deleted the duplicated objects on one side of the y-axis that I created earlier, selected the original 3 objects that remained, and used Mirror Geometry on each one in turn to simultaneously mirror and merge them across the y-axis.
5: I selected only the faces of each piece on the part of the head that is visible to the eye when all pieces are put together, leaving the faces that touch the other pieces and the inside hollowed out part unselected, and used Edit Mesh: Smooth to smooth out each piece. This creates some polygons with more than 4 sides, which Zprint doesn’t like, so after smoothing I used Edit Mesh: Cleanup, checking only the box that says “faces with more than 4 sides”.
6: I checked my model to make sure there were no holes or 5+ sided faces, and to make sure that each of the three pieces fit together seamlessly, then exported each piece separately as an OBJ file.
7: I then opened each OBJ file in Rhino, exported them as STL files, and imported them into Zprint, where they were (hopefully) ready to print!
Update
The past few weeks I have been printing out a lot more heads for my puppets; I should be nearly done except for a few expression changes on the minor characters, and some in-betweening on the main characters. I've also made more progress on building my set, and once I get the reimbursement from my production budget I can buy more supplies and finish things up.
The most fun thing has been seeing all the heads I've printed out in their true 3D form, after drawing them on paper and modeling them virtually, and the subtle and not-so subtle changes that come with each translation to a different medium.
The most difficult thing is trying to figure out what to use to make each part of my set LOOK realistic without being too heavy, bulky, or expensive, especially the metallic pieces. Hopefully I'm achieving a balance between feasibility and believablity as far as set dressing and props are concerned.
I also wrote up a progress description for my technique in modeling the puppet heads, which I'll post
The most fun thing has been seeing all the heads I've printed out in their true 3D form, after drawing them on paper and modeling them virtually, and the subtle and not-so subtle changes that come with each translation to a different medium.
The most difficult thing is trying to figure out what to use to make each part of my set LOOK realistic without being too heavy, bulky, or expensive, especially the metallic pieces. Hopefully I'm achieving a balance between feasibility and believablity as far as set dressing and props are concerned.
I also wrote up a progress description for my technique in modeling the puppet heads, which I'll post
Tuesday, October 26, 2010
Progress 10/26
This week, and in the last month generally, I worked on finishing up the Maya models of my heads, so they are ready to print on the 3D printer. As I do more and more modeling in Maya I find it gets faster and easier, although the models are still not quite as I imagined them, they are definitely serviceable and look fairly close to my ideal. Coming to terms with the fact that I cannot control everything and have it turn out perfectly has probably been the most difficult thing this past week, as I cut my animatic down significantly. I realized that at some point I have to accept that I can't produce everything to the perfect levels of a real animation studio that employs several thousand people and takes many years to finish a film, but I can do my best and set myself up to succeed in what I can accomplish, rather than setting myself up for failure by being overambitious and having more shots and characters than time allows.
The most enjoyable thing this week was probably feeling like I'm getting a grasp on the 3D printing process; I find I'm getting a lot less unexplainable annoying errors when I go to print, and the errors that do pop up I now know more or less how to deal with them, rather than it being a huge frustration and waste of time, like it was a few weeks ago.


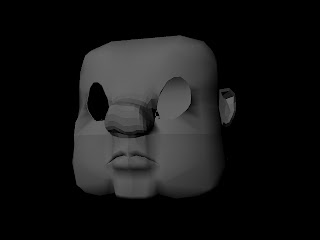


 Some tips if any aspiring stop-mo animators want to use the 3D printing process through z-print: obviously, you need to close up any holes in your geometry, but it is equally important to check every so often as you model to make sure that all the face normals are pointing outward. Especially check the normals before you smooth, because changing them after is a lot harder. Also, I found that running (Mesh): cleanup, with the settings checked to cleanup only polygons with more than 4 sides, can be a big help if you do it just before exporting out of Maya as an .obj file. This saves heartache later when you can't figure out why the Z-print preview has mysteriously dropped a lot of random faces on your model, leaving ugly holes instead.
The most enjoyable thing this week was probably feeling like I'm getting a grasp on the 3D printing process; I find I'm getting a lot less unexplainable annoying errors when I go to print, and the errors that do pop up I now know more or less how to deal with them, rather than it being a huge frustration and waste of time, like it was a few weeks ago.

Some of my Maya head models, ready to print


Tuesday, October 19, 2010
3D printouts
Well, after many problems, troubleshooting, and complete redos, I finally managed to create a model that was compatible with the multiple programs required to print my puppet heads.
The most enjoyable part of the last few weeks was when I finally got a workable model, so I was able to get more creative and adjust it to get different expressions. By Thursday I should have some of the actual expression heads printed out; right now I only have the basic head (3 parts) in two different sizes. I've decided to go with the larger size for the rest of my models.


.JPG) The most difficult part was, obviously, having to remodel so many times. But now I'm good to go, and I'm planning on modeling the other characters' heads shortly. The last picture shows the lineup of the expression heads in Zprint, just before beginning printing
The most difficult part was, obviously, having to remodel so many times. But now I'm good to go, and I'm planning on modeling the other characters' heads shortly. The last picture shows the lineup of the expression heads in Zprint, just before beginning printing
The most enjoyable part of the last few weeks was when I finally got a workable model, so I was able to get more creative and adjust it to get different expressions. By Thursday I should have some of the actual expression heads printed out; right now I only have the basic head (3 parts) in two different sizes. I've decided to go with the larger size for the rest of my models.


.JPG)
Tuesday, October 12, 2010
head models
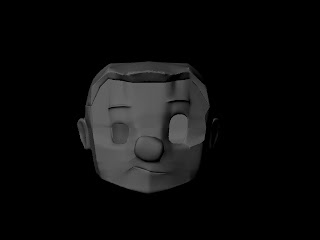
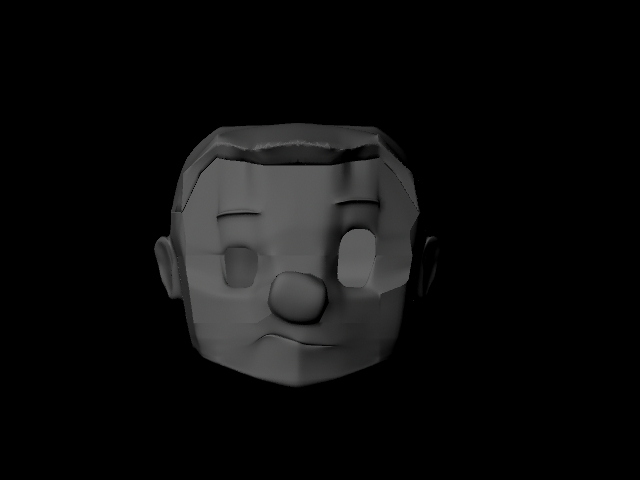
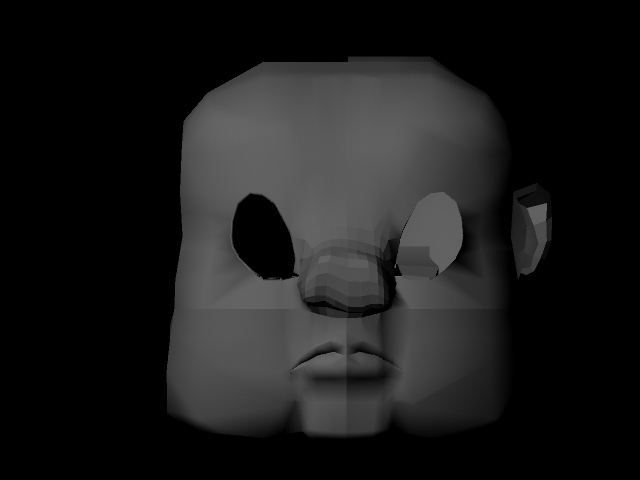
Well, after several weeks of problems with Maya modeling, including a broken hard drive, incompatibility between Maya versions, holes in models, and issues with normals, I am now on model #3 of the main character's head, so hopefully THIS one will work out and jive with the 3D printer. I also began modeling the mother's head:






Tuesday, September 21, 2010
Thesis Update
Well, this week I am finishing up my animatic and building the last 2 armatures I'll need. I've also got the basic set materials and I'm beginning to cut them according to the scale blueprints I've drawn.
The most fun thing this week was doing composition/film studies in preparation for my layout/color keys. Once these are done I'll head to the Fabric District to buy yards of fabric in the colors dictated by my color keys, and begin the costuming process.
The most difficult thing was staying up really late every night to try to finish this animatic. It's been taking the majority of my time and I'll be more than happy to get it over with and move on to more fun parts of the process.
The most fun thing this week was doing composition/film studies in preparation for my layout/color keys. Once these are done I'll head to the Fabric District to buy yards of fabric in the colors dictated by my color keys, and begin the costuming process.
The most difficult thing was staying up really late every night to try to finish this animatic. It's been taking the majority of my time and I'll be more than happy to get it over with and move on to more fun parts of the process.
Monday, September 13, 2010
Weekly update
This week I've been focusing on character facial expressions, specifically for my main character. So far I've drawn: Blank, Concentrating, Annoyed, Annoyed and Disgusted, surprised, nonplussed, confused, unsure, discovering a pastry, ambiguously skeptical, rolling eyes, embarrassed, mouth full, eating, scared and disgusted, scared, more scared, grossed out, confused, sticking tongue out, ghostly, screaming, etc.
I drew them all on paper from the front view, some also from the side, and a lot I drew in 3/4 view in the actual animatic.
I've also been working a lot more on my 3D model of the boy's head. It's been fun trying to figure out the logistics of translating 2D expressions into 3D models, but it will also be a huge challenge. We'll see how it goes.....................
I drew them all on paper from the front view, some also from the side, and a lot I drew in 3/4 view in the actual animatic.
I've also been working a lot more on my 3D model of the boy's head. It's been fun trying to figure out the logistics of translating 2D expressions into 3D models, but it will also be a huge challenge. We'll see how it goes.....................
Monday, September 6, 2010
Week 2 Fall '10 thesis blog
This week I've been working mainly on storyboarding for my animatic, and modeling the boy's head in Maya so it can be printed on the 3D printer.
One thing that was difficult was trying to draw my storyboards in Photoshop without a Wacom driver for the computer. Being in the new animation building is great but it has its drawbacks, as the new computers still need some tweaks and programs to be fully functional. Without the Wacom driver installed, the tablet has no pen pressure setting, which has been hard to work around.
I've tried making some hands out of wire and liquid latex, which has been a lot of fun to experiment with. Some turned out okay and others look like a drippy mess, so more work is needed as I expect to need approximately 3 pairs of hands for each character, and far more for the main character.
As soon as I finish my animatic, I can move on to color keys, which are essential so I can lock in the color palette and buy fabrics to begin costuming the puppets. The head modeling is coming along on schedule.
One thing that was difficult was trying to draw my storyboards in Photoshop without a Wacom driver for the computer. Being in the new animation building is great but it has its drawbacks, as the new computers still need some tweaks and programs to be fully functional. Without the Wacom driver installed, the tablet has no pen pressure setting, which has been hard to work around.
I've tried making some hands out of wire and liquid latex, which has been a lot of fun to experiment with. Some turned out okay and others look like a drippy mess, so more work is needed as I expect to need approximately 3 pairs of hands for each character, and far more for the main character.
As soon as I finish my animatic, I can move on to color keys, which are essential so I can lock in the color palette and buy fabrics to begin costuming the puppets. The head modeling is coming along on schedule.
Monday, August 30, 2010
First post of Fall 2010 semester
Well, I did get some work on my puppets and set done over the summer, but not as much as I would have liked. The most difficult part of my process has been trying to find the money to buy the supplies I need, and looking for methods of making set pieces that will cheap enough not to strain my budget while still looking good. Pictures of my puppet armatures to come soon.
Another difficult part of the process this week has been re-working my storyboards and animatic. I've cut out some scenes that seemed either too boring and irrelevant to the story, or too difficult to animate in the time frame I'm working under. Right now I'm redrawing all my boards in photoshop, trying to work adding in more dynamic angles and shots. I've seen enough subpar animated student films where the characters just sit flatly in the middle of the screen to know that is NOT what I want.
I want to take my film in a more cinematic and hopefully more professional-looking direction, cutting on the action and using interesting closeups and angles, even though with my limited stop motion equipment a lot of camera movement (pans, tracking etc.) won't be an option. To help me conceptualize what a successful film looks like, I've done some film studies of shots from Coraline, Spirited Away, Corpse Bride, and several other movie clips.
One thing I was happy with this week is how the seats I'm building are turning out. I thought a lot about how to make seats that (a) all look more or less identically mass-produced, (b) are cheap and (c) are strong enough to hold up to about 5-6 months of animating. The best method I could come up with was to use fiberglass cloth with resin, molded to a curved piece of metal bent to the shape the seats will be.
Using this method I now have 4 more or less identical, fairly smooth double seats, though they still need to be sanded, primed, and painted. It's too soon to know how they will look at the end of the day, but I was happy to find a reasonably economical method that met the seat criteria I had set. The background seats that will not be in heavy use will just be thin aluminum metal, bent to the appropriate shape and primed and painted to look like the fiberglass seats.
Another difficult part of the process this week has been re-working my storyboards and animatic. I've cut out some scenes that seemed either too boring and irrelevant to the story, or too difficult to animate in the time frame I'm working under. Right now I'm redrawing all my boards in photoshop, trying to work adding in more dynamic angles and shots. I've seen enough subpar animated student films where the characters just sit flatly in the middle of the screen to know that is NOT what I want.
I want to take my film in a more cinematic and hopefully more professional-looking direction, cutting on the action and using interesting closeups and angles, even though with my limited stop motion equipment a lot of camera movement (pans, tracking etc.) won't be an option. To help me conceptualize what a successful film looks like, I've done some film studies of shots from Coraline, Spirited Away, Corpse Bride, and several other movie clips.
One thing I was happy with this week is how the seats I'm building are turning out. I thought a lot about how to make seats that (a) all look more or less identically mass-produced, (b) are cheap and (c) are strong enough to hold up to about 5-6 months of animating. The best method I could come up with was to use fiberglass cloth with resin, molded to a curved piece of metal bent to the shape the seats will be.
Using this method I now have 4 more or less identical, fairly smooth double seats, though they still need to be sanded, primed, and painted. It's too soon to know how they will look at the end of the day, but I was happy to find a reasonably economical method that met the seat criteria I had set. The background seats that will not be in heavy use will just be thin aluminum metal, bent to the appropriate shape and primed and painted to look like the fiberglass seats.
Thursday, May 6, 2010
Subscribe to:
Posts (Atom)